Sunday, October 16, 2011

A little embroidery….

can transform a boring skirt into something a bit special.

IMG_0880

Take one 70’s stretchy skirt…

IMG_0881

…add an old embroidery transfer…

IMG_0885

…and play around with stitches you got from an old embroidery book.

IMG_0883

It looks better on me than on the mannequin, but I never take photos of me if I can possibly help it! The stretchy synthetic fabric was the devil to embroider neatly and I should have used some stabilizing fabric to stop it puckering, but overall I think it’s pretty cute.

Beccy @ wipster 

Saturday, June 18, 2011

Purple and dots dress refashion

From this:


My friend E's late grandmother's dress.

To this!!!!:


Loooveeee!!!!


Hi everyone!
It's been a long not sewing/refashioning time...But now it's time to get creative again!
I hope you are stitching up many nice things. :-)

Ciao!

Barbara

Monday, June 6, 2011

Swimwear for Fun & Poop Containment

I've been thinking about making a swim diaper for Penelope over the last few weeks. I wanted to make something like a Swimmi. Last weekend I went to Joann's and lo and behold, they had swimwear fabric in their clearance bin,and since all of their clearance fabrics were 50% off, the 1/2 yard that I bought only cost $1.25 plus tax. Can't beat that with a stick.

Since I had enough fabric, I decided to make a matching top. I went with a long sleeved, envelope neck T-shirt. I wanted the extra coverage for sun protection. I used McCall's 6103 for the top, but you could easily make a pattern yourself using this Made tutorial.


I guess I wasn't the only one thinking about swim diapers, because there's a great tutorial on Sew, Mama, Sew! as well. Their swim diaper is either a pull-on, or a side snapping diaper. I don't like the idea of a pull-on, and I don't have a KAM snap press/pliers (yet!), so I decided to go ahead with my original idea. You should go over there and take a look at the pictures. They can be really helpful if you've never used fold-over-elastic.

I used the Chloe Toes free diaper pattern to make the bottoms. I made the preemie size, because it's just going on a bare butt, no prefold or other soaker layer. The fabrics I used were a swimwear fabric outer, an inner layer of *polyurethane laminate fabric (PUL), and a layer of mesh. I got the mesh at Joann's, in the utility fabric section. You don't want to get the netting that they have in the apparel fabric section. It's not sturdy enough. You will also need hook and loop tape and fold-over elastic (FOE). You can get all of your supplies at Joann's, that's where I got mine, with coupons of course.

 Cut a patter piece from each of your 3 fabrics. I wanted some butt ruffles, who doesn't, so I cut two 1" wide strips from the selvage edge of the fabric. The selvage edge was white, so I thought it would look cuter than cutting the strips from the printed part.

Sew a long running stitch down the ruffle strips (the length and number of strips you will need will vary depending on which size diaper you sew). Lay your PUL, shiny side up, and put your outer fabric (in my case, swimwear fabric) right side up, on top of the PUL. Arrange your ruffle strips on the back end of the pattern and pin. Sew a straight stitch down the middle of the ruffles.


Place a strip of loop across the front of the pattern, and sew down both long edges using a straight stitch.


Both the ruffles and the loop tape are sewn to the outer fabric and the PUL. Don't sew those two things just to the outer fabric, especially if your outer fabric is a knit, because it won't be as sturdy and it could warp the shape of your outer fabric.

Pin the mesh pattern piece to the other fabrics, so that the mesh is next to the PUL. Don't pin the back wings of the pieces together.


Cut two 1" pieces of loop tape and sew them to the back wings of the fabric. Only sew them to the mesh and the PUL, leaving your outer fabric free. These will be your laundry tabs, and will keep the hook/loop tape from snagging anything when washed.


 Pin all three layers together, marking the elastic placement points noted on the pattern. Sew your fold-over-elastic all the way around your fabrics, making sure to stretch it between those elastic placement points. Check out the tutorial I linked to if you have never used FOE. There are also some great video tutorials on youtube showing how to use it.

 Cut four 1.5" pieces of hook/loop. Two pieces from loop side and two pieces from the hook side. Round one end on each of the pieces, and do a nicer job than I did.


 You will sew these on to the ends of the back wings. The loop part will be on top of the outer fabric and the hook part will be against the mesh, so that the wing is sandwiched between the two pieces. Sew all around the tabs using a straight stitch and then zigzag around to keep the hook/loop tape from fraying.


 Here's an action shot of the laundry tabs. Pretty neat, huh?


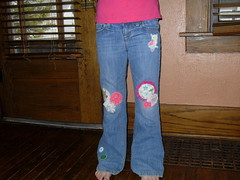
 Here's Penelope modeling her new swimwear. From the waist up, she looks like a Duggar.


*You can get PUL at Joann's, in the utility fabric section. I've heard that their PUL is of crappy quality if you use it for covers which require constant washing. Since this is just a swim diaper, I think their PUL would work.

From Eema-le.

Wednesday, June 1, 2011

Feelin That Cloth Diaper Love

I've been hard at work, sewing fitted diapers from various free patterns that I found online. I'll post a more detailed description later. 


This fitted was made from a regular prefold. I used this tutorial. I like the way it turned out, but the leg edges are a little too stiff for my liking. I might make a few more from larger prefolds. 


 Here's Penelope in the prefold with a fleece cover on. I made the cover using Katrina's pattern, and then washed it with some fabric softener. The softener helps the fleece become more water repellent. It actually works. I wasn't sure that it would work, but she had a good pee and nothing got wet. Notice that Penelope is enjoying her new taggie blanket.


Here, Penelope is modeling another fitted diaper that I made. It's one of the ones that I'll blog about later, but I thought I'd post a picture as a teaser.


I also made a bunch of doublers to use at night. I bought some microfiber car towels, eight for $4 at Walmart, sewed another fabric on top of them, and then turned and top stitched them. I used flannel on half of them and a knit on the other.

From Eema-le.

Taggie/Teething Blanket Tutorial

There are loads of different taggie blankets out there. I wanted to make one for Penelope because she's been putting everything in her mouth and drooling like crazy. This should satisfy her need to gnaw on things and sop up some of that drool.

Materials; ribbon (I used grosgrain), 2 different fabrics (I used a flannel and a terry), some thread.


Cut;
One 10"x10" square from each of the fabrics (2 total).
Eight 5"x2" pieces from each of the fabrics (16 total).
Eight pieces of ribbon 4" long.
One piece of ribbon 2" long.


Sew the 5"x2" pieces, one of each fabric, right sides together. Leave one short end open for turning.


Turn the rectangles right sides out and lightly press. Fold the ribbon pieces in half and lightly press as well.


Cut off one corner from the larger square pieces. I went in 2" on either side of the square.


Pin the ribbons and rectangles onto one of the larger squares. It's really easy if you have a gridded mat. The shorter piece of ribbon should be pinned to the lopped off corner (bottom right hand side in the pic). Baste all 4 sides.


Layer your second piece of fabric over the basted piece, right sides together. Stitch all the way around, leaving a small opening for turning. Turn right sides out and topstitch, making sure to close the opening that you used for turning.


I knotted a few of the rectangles to give Penelope some thing to really gnaw on. I also added a split ring from another toy to the short ribbon in the lopped off corner.

From Eema-le.

Wednesday, May 18, 2011

Pintucks in corduroy?

IMG_0065

This skirt was waaay too big, and dull. You can see where I had put a box pleat in the front but I didn’t like it very much so I unpicked it and started again.

IMG_0066

I saw this idea in Sew Subversive and thought it might work even though the cord is very bulky.

IMG_0086

I kinda like it. I sewed the pintucks down with contrast stitching so they face the middle and yeah, it is a little bulky but I much prefer it to how it was before. I might dye it a more chocolatey colour too because it is at the mousey grey end of the brown spectrum.

IMG_0087

Beccy from Wipster 

Monday, April 11, 2011

saving my (thrifty) Hungarian bag

Hello again everyone!

It's been a while since I post something in TGR. Here's my latest project, saving my dying thrifty Hungarian Bag, purchased on a flea market for 60 cent on 2000. The labels sewn inside says "Made in Hungary", "Hand Embroidery" and "55%wool 45% cotton". Even the labels was handwritten! I don't have picture of the original bag, but it was something that looked like this :
I got bored with tote bag and on 2004 I change it to a sling bag with cotton webbing strap. But the bag looked uneven due to stretchy woolen material the bag was pulled to the north a bit and the bag never seen the day again.


Until last week, I was tidying up (switching our summer clothes to winter clothes) and I saw this poor old thing. A bit snip in here and stitch in there, I got a brand new bag which I really really love. I can wear it as shoulder bag or sling bag.


The complete Tale of the (thrifty) Hungarian Bag can be read here.


Sunday, April 3, 2011

Old sheets into a tablecloth and summer skirt

Hello! I've just joined you all and wanted to introduce myself. I'm an American in Paris, mommy of two (and thus blogging as "Mommy en France") and have recently returned to sewing after a very long hiatus. I am interested in refashioning, adapting ready to wear to my own shape and style, and in extending the life of my kids' clothes. I'm also slowing starting to sew "properly" from patterns, although this terrifies me a bit. Oh, and I blog over at Two little cabbages & cie.

I have a great stash of old sheets from my French mother-in-law and I have been starting experiement with dying some of the less ornate ones, then turning them into things. This weekend I dyed a few green and made a tablecloth and a skirt.

The tablecloth was very simple. I just folded a large sheet in half, ironed it flat, sewed around almost all four sides, very close to the edge, then turned it right side out (like you do when making a pillowcase), ironed it flat and sewed shut the opening. It's a lovely colour and a nice heavy old cotton fabric and looks good on the table, without being too fancy. The kids can spill on it, I can throw it in the wash and it will be fine. It's lasted at least 75 years as a sheet, so I'm sure it will make it a bit longer as a tablecloth.


The skirt was more fun to do. I used another sheet I'd dyed green and this "Super Easy Patternless A-line Skirt" tutorial from Sarah at Boulevard Designs. The sheet itself had a cool pattern of embroidery and cut  outs along one edge, so I used that as the front hem. I recycled a hidden zipper from a dress in my "refashion" pile and I made a tab to cover the top, using buttons I already had and an old hair elastic of my daughters. So the cost of supplies was almost free - I only had to spend money on the dye. Thirteen euros (about 15 dollars) for a box of Dylon, which resulted in a tablecloth and a skirt. You certainly couldn't buy them here for that price!

More importantly, the skirt looked pretty good and it only took me about two hours. I'm sure it would take a more experienced seamstress even less time.

 A shot I took myself of the front hem...

...and a shot my husband took. As you can see, the fabric wrinkles easily. But the skirt is a nice shape! Please excuse the boots - it poured earlier today, so we all wore our wellies to the park  this afternoon.

Monday, March 21, 2011

Knit Wit

I was told by my midwife to take it easy and just cruise on the couch. That's not an easy thing for me to do, so I've been knitting. I found all of the patterns on Ravelry, but since you have to have an account (totally free and well worth the few seconds that it takes to set on up) to view the site, I've linked to the original location of the patterns.


I've also finished Charlotte and Penelope's outfits for the open house that we're having in April. I wrote about the projects here and here a few months ago. The total cost of materials was probably around $15. The denim came from 2 clearance remnant bits, the lining was a donation from my mom (more than 15 years old), the lace was from a skirt I got in 8th grade (I'm almost 34, you do the math). I also used snaps, thread, elastic, hooks, and thrift store zippers, that I already had on hand.
 

McCall's 5791, a combination of views. The denim is not this dark in real life.


The jacket is View E from Simplicity 3513, and the skirt is McCall's 5461 (discontinued).
 

Monday, March 14, 2011

I found a spot of time for some sewing…

I saw a girl the other day wearing the most beautiful jacket – it was navy with white piping, with big white double-breasted buttons. It was fitted and lovely.

I pointed her out to my friend, and realised that I had that jacket, or at least I could have it if I took in the shapeless 60’s ‘land ahoy!’ jacket below…

IMG_0511

It was a bit of a faff, because I had to remove the lining, add multiple darts, reset the sleeves and then hand sew the lining back in, but I think it came out ok and is much more wearable now. I may never look like that lovely girl, but at least I now have a similar jacket!

IMG_0514

Pop by my blog for more refashions!

Beccy

Sunday, February 20, 2011

Patched Jeans

Trinity's patched jeans

I patched a pair of Trinity pants last night.  It's hard to find stuff that fits right...she's really hippy. (these are Old Navy) I have another pair doesn't have holes yet but she wants me to do. 

The owl and 3 (you can only see 2) flowers at the bottom were iron on patches I found at Jo-Ann's the knees I just cut different size circles.  Before I added the circles I reinforced the knees with those old school iron on patches.  I did that on the inside of the pants.  I also used interfacing on the circles.  I hand sewed them on with embroidery thread.  I also stitched around the iron on patches because they always seem to fall off.  I think they ended up kinda cute :)

Thursday, February 17, 2011

The Bookshop Bag with PDF pattern download

I know I haven't posted anything in a while and that's becuase I haven't really made anything in a while!

I decided to make a bag out of some fabric salvaged from an old men's suit jacket that I bought at an estate auction. Actually I got an entire closet of handmade vintage wool suits for $2.50. lol I used some scrap for the liner, two free buttons and some trim that a friend gave me. I'd say maybe the whole thing ended up costing about 60 cents.


I liked it so much that I made a free downloadable PDF pattern. You can get it on my blog!