Monday, May 31, 2010

Another Shoe Reboot (ha!)

I love my black Doc Martens maryjanes--got them at a thriftshop a few years back, wore them constantly. They're sturdy but they got scuffed pretty badly. Probably could have just polished them, but....
I went a little past shoe polish. They've been painted and collaged and sharpied. I never had blue shoes before. Now I do, and they feature Christabel Pankhurst, suffragette--so, bonus.

(While looking up that link, I found out that the very English Dame Pankhurst is buried in Santa Monica, within half an hour of my house. Should take the shoes to visit her gravesite? Macabre, photo-op... or macabre photo-op?)

Saturday, May 29, 2010

Redo Fail

Well this didn't quite turn out as I imagined. Its not by far the worst thing I have ever made but it feels entirely uncomfortable!

I got this pattern at a local shop.
Its a great design for a hot season here in the desert.

I had gotten this fairly ridiculous suit set thing for a buck a week ago and I thought perhaps it would work for a short cut on this pattern.
I just took in the skirt from the set and cut the top of the dress from the jacket and attached the two but alas the top of the dress just does not fit me at all!! I have a small chest but I feel like im spilling over the sides and the darts do not hit in any sort of flattering area. Plus because I didn't add the buttons in the back the dress is extremely difficult to squeeze over my shoulders.. ugh
So this is going back to the redo pile where it came from. I will probably end up ripping the top off and keeping it a skirt of some sort. I still like the idea of this pattern and I will definitely try to make some adjustments and try again. Read more here on my blog.

Another Halter

Here is another one of those halter tops that I test sewed this week.  This time I used an old tank top that doesn't fit anymore.  I dyed it using tea.  That was kinda fun.  I've dyed my far share of yarn and fiber but never fabric.  I think I'll be have to play around more with dyeing fabrics.  I still have tons of different colors!  Anyway.  I like how this one turned out, but I do wish I would have had more fabric to make the ruffles longer. 
Test sewing, refashion, and tea dyeing

More pics and pattern info on the blog :)

merlinthecat

Friday, May 28, 2010

Hello and introduction

Hi! Thanks for letting me be a part of The Thrifty Garde Robe!

I'm Melissa and I live in Maryland with my husband and our 4 kids. I love to sew and I try to find time to do it as much as I can, which isn't easy. My mom taught me to sew when I was a little girl, but it's only been in the last few years that I've taken it up seriously again. I signed up with Wardrobe Refashion last year, but my 3 year old son became sick soon after my term began, so I ended up not doing much sewing, let alone posting about it. Now, nine months later, his treatment has ended and he's recovering nicely, and I have a little more time. I thought about re-signing with WR, but was disappointed by the new changes. I am glad I found The Thrifty Garde Robe and the opportunity to be a part of a community of such talented people! I've lurked occasionally on some of your blogs and have been so inspired.

I'm finishing up a skirt using McCall's 5631. I hope I can get it done soon to post about it!

Tuesday, May 25, 2010

Hi I'm new here

Hello...Hope you don't mind if I join in!

My name is Farah.  I enjoy my hobbies very much (sewing, knitting) and would love to have more time for them, but alas...i'ts not always the case.  When I do make something new, I blog about it at http://farahmakesstuff.blogspot.com/

My newest pattern is New Look 6972, a little dress for my little girl.  Bought the fabric and the pattern on sale, and I love the results.  Check my blog for more details.

Thanks for looking,
Farah

Monday, May 24, 2010

More stuff for my youngest

Up first we have a super cute dress.

014

And next I got to do some test sewing, a little knit top.   I've always enjoyed test knitting and this was the first time I've ever tested a sewing pattern.  It was fun.

 Test Sewing

More pictures and pattern info over on the blog!

merlinthecat

Friday, May 21, 2010

Orange polkadot doily top Burda 5/2009-103A


Used - orange polkadot knit remnants, a small pareo and a cotton doily.

Ciao!
Barbara

Thursday, May 20, 2010

Women's Halter Top with Built In Shelf Bra

Yesterday I figured out how to make this great halter top...

...and how to line it with a shelf bra (made from a recycled t-shirt)

Pop on over here to my blog for the full pattern-free tutorial.


- The Sewing Dork

Tuesday, May 18, 2010

Sigh No More DIY Skirt

So I got this huge dress for a buck and it still had the original tags on it. I loved the color and it is the softest knit fabric.

I used a great tutorial on recreating this Burberry draped skirt.

You can find the link on my blog. Don't forget to enter my giveaway which ends tomorrow.

Monday, May 17, 2010

Thrifted Shoes Upcycled

Before (thrifted, Dansko, my size, good condition and comfortable, but I have enough red shoes):

After some paint and collage and modpodge and spraycoat:

Sunday, May 16, 2010

T-shirts to Tanks

I took these flash dance style toddler t's

Before


and turned them in to super cute tank tops.
both done, so much cuter

Visit my blog for the details and a tutorial (my first).

Merlinthecat

Cardigan refashion from Hazelnuts

It's taken me ages to post over here but at last I have something to say so here I am!  I'm Jacqui from Hazelnuts.  I've been participating in Elsie Marley's Kid's Clothing Week Challenge and did this cardigan refashion for my daughter as part of that.

------------------------------------------------------------------

My daughter Hazel's size 110cm (about a 5T) cardigan.

Cardie refashion


Originally it looked like this:


Original cardigan


I see that the original photo was taken way back in October last year so it's taken me awhile to get around to it!  I was inspired by a clever cardigan refashion by Tiny Happy who told me it wasn't that hard and actually it wasn't! This is what I did:
  1. Cut off the sleeves and tried it on Hazel and pinned where I thought the shoulder seam/side seams would be.
  2. Unpicked the neck facing or whatever it was called. I managed to get the overlocker seam to unravel by pulling random threads (is there a trick to knowing which one to pull? I only ever find it by accident or when it's unravelling clothing I want to wear in which case it's very easy).  This meant that, except in a couple places where I nicked it, the edges didn't unravel.  I undid the facing along the back and on the front just past about where I thought Hazel's shoulder seam would be.
  3. Found a shirt pattern for a V-necked button-front shirt and matched the pattern pieces for the arm area and arm to the pinned positions as best I could. I do wish, however, that I'd had a good cardigan pattern to work from that was designed for knits as this one ended up being too big and the cardigan needs taking in.
  4. Cut the pieces out and resewed with an overlocker.  After I tried it on Hazel I discovered it was fine along the neckline despite being too big around, so I went ahead and attached the neck facing and added the ruffle and buttons.  I sewed the ruffle on with a twin needle to give it a bit of stretch along with the knit neckline.  I tore the ruffle in long strips from the fabric so it still has the raw, slightly fluffy, edge.

Cardie refashion details


Mat thinks the buttons are a bit OTT but the originals were so... late '90s know what I mean?  The only problem I ran into was that the original facings overlapped more than I'd assumed they would so I had to shift the buttons way over to the edge so the right ruffle there wasn't covered over!

The flower was made from a tutorial at Pink Paper Peppermints that I found via a lovely little dress on My Sewing Circle.  It's on a bit of felt attached to a pin.  This is the one I prefer; but I had made a smaller one from the stripy fabric that Hazel likes best so she can have that one on it (too matchy for me!) and I'll have the photograph and the memories...


Cardie refashion details

Wednesday, May 12, 2010

Ruched Halter Top

I stole Hubby's big tshirt and made something for myself.


It is made basically by using the body of his shirt, adding a casing and elastic at bust, then adding a long strip gathered at both sides. (Sorry about the scary white Canadian-winter arms.) I posted an actual tutorial here on my blog if you'd like to make your own.

Tuesday, May 11, 2010

Rompers & Undies


I fell in love with this pattern a few weeks ago at one of our local thrift shops. I have so many pictures of myself as a kid wearing this style of shorts and tanks, typical 80's kids wear. I knew that I had to make a speedsuit (romper) for Charlotte.


This interlock came from the remnant bib. I LOVE remnant bin shopping. I used bias tape for the binding and ties since I couldn't find any fold over braid at the store and I didn't feel like ordering any.


This interlock came from the thrift store. I've been really lucky at finding great fabrics at my local thrift stores.

I also made another batch of undies for Charlotte. Three of the pairs are made from thrift shop fabric and the other two are made from remnant bin fabric.


I used fold over elastic for this batch and I think that the edges look fantastic. They really look professionally finished.

NinjaEema

I was wondering

Hi everyone! I picked up this little cutie for my 6yo who has been bugging me to learn to sew for over a year. I works, but I can't get it threaded right. I was wondering if anyone had any advice. I've googled and you tubed all morning and haven't been able to find a thing. There are more pictures and info on my blog.

Vintage Sears Crystal Toy Sewing Machine

Thank you :)

merlinthecat

Monday, May 10, 2010

Dress & Cardi


Hello my people!! I haven't posted for a while, too busy fluffing about!. Have a whole heap of half finished bits and pieces and a HUGE stash of op shop finds waiting to be "reconstructed/deconstructed.

The crochet top (now cardi) is in the yummiest shade of cranberry. I cut it down the front and added a mens paisley tie that ive zigzaged and rouched till it made a lovely frilly type edge on the cardi. The photo isnt much chop coz my husband reluctantly took the photo (hes not talking to me because i got grumpy at him..............long story, we wont go there!!)

The other photo is my gorgeous friend Karen modeling a "work in progress" denim dress that was previously a pair of jeans and a mens tie. This will be in my Esty shop which is NOW OPEN!!!! arrrgggghhhh YAY!! fluffnnonsense.etsy.com CHECK IT OUT. xx Kel

Sunday, May 9, 2010

mother's day project

I had some free time today, and this is what I made,

A non-slip baby changing pad! And I did this on Friday,

Come see me at my blog for more details and how to's!  Thanks, and happy mother's day to all!   Anne

Saturday, May 8, 2010

Using T-Shirts

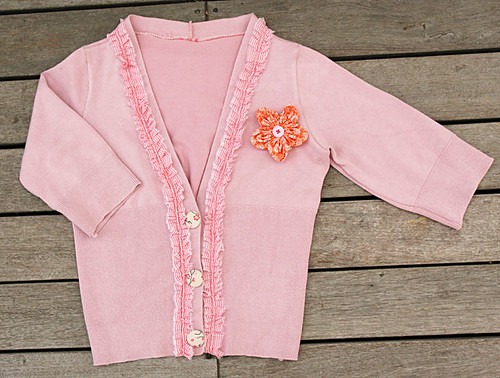
Jersey is great for the quick fix as it does not require finished edges. I like the raw look. I'm drawn to the organic-ness of it. Plus I feel less inhibited... if I make a "mistake" while trying to save the shirt it will somehow be less noticeable. So far this theory has worked for me. So, here are a few shirts I saved with the use of old T-shirts. This grey shirt had the best long sleeves but also came with a bleach spot along the neckline. I simply cut out some leaf shapes from a scrap t-shirt and sewed them on. Added a few buttons and yay! I've a shirt I will wear out in public again.
Quick Fixes
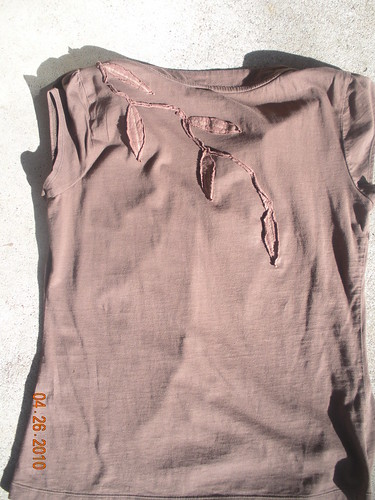
Now this brown beauty I found at a bag sale and when home I saw a tiny hole near the lower front and center. Turns out Teo saw it too for he proceeded to stick his finger in it to show me. Something had to be done! Using another scrap t-shirt I cut out leaf shapes and long strips. (Leaf shapes, organic, raw edges... all connected.)
Quick Fixes
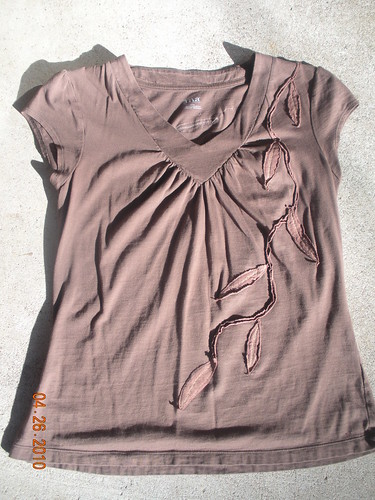
Placement required pinning since I had to use care around the gathers in the neckline and bust. (A dress form would have been helpful, nothing brings on swearing faster than sticking a pin in your boob.) Well, I liked the "vine" look and so I kept it going over the shoulder onto the back. I wear this shirt often and without profanity.
Quick Fixes
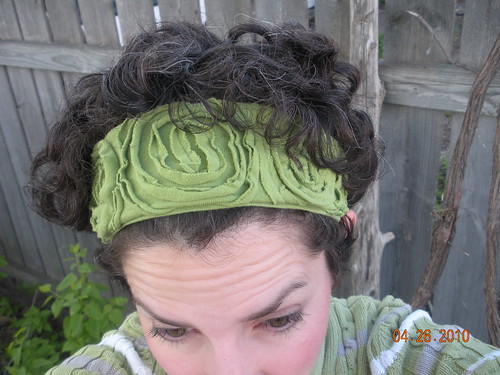
I've also played around with headbands. Now that my hair is growing out I'm wearing them again. My favorite way to make a headband is to recycle a t-shirt sleeve from one of my husband's old t-shirts. Cut off the sleeve and simply sew long strips in a circular pattern around the band letting the raw edges do their thing. (However it won't hide silver hairs.) I've known about them I just didn't notice how noticeable they were. Curly hair hides a lot. Except from above I guess.
T-Shirt Sleeve Headband
It's snowing here today. I dislike it as much as poking myself with pins.

Friday, May 7, 2010

Cloth Pantyliners

There are tons of free patterns/tutorials for making cloth pads and pantyliners. This is my version.

I used a disposable pad to trace a template. BTW, the best disposable pads out there are Always Infinity pads, they can soak up a gallon of windex and still feel dry.


Here's my pattern. You might want to make your pattern longer or shorter depending on your own preferences.


I cut the top layer from some suede cloth (it's supposed to be really good for wicking away moisture), the bottom layer is printed flannel, and there are 2 more layers of plain flannel for the center of the pad.


Sandwich your fabric with the suede cloth (top fabric) right side up, then add the flannel (bottom later) wrong side up, then add the 2 middle layers on top of the flannel. Sew all around the edge, leaving a 2" gap. Turn the pad right sides out and topstitch along the edge closing up the 2" gap.


I added another row of stitching around the center of the pad. Add your snap.


Here's the pad folded up. You can also just layer the fabric together as follows; flannel wrong side up, 2 middle layers, suede right side up. Then stitch around the edge, zigzag over the edge, add an inner row of stitching and add your snap. It's faster but gives you a less finished looking edge.


NinjaEema

Cut two, Sew one

From this aargghh!!! boat neck!!

And this
To this, cut two lines, sew one, all done dodgy pics again lol more at my blog.