Wednesday, June 30, 2010
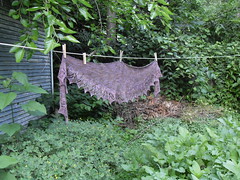
A Shawl
Details and more pictures are on my blog.
Saturday, June 26, 2010
Monday, June 21, 2010
Sunday, June 20, 2010
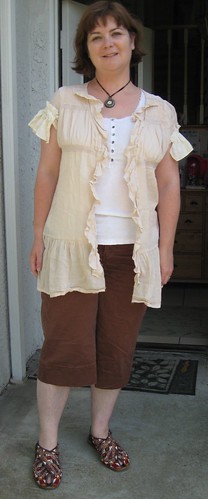
Frankenblouse x3
Friday, June 18, 2010
A tool from the 1950's that still brings joy in 2010
See the price tags? Yeah, you saw it right, $2 and $1. They go online for $69.95 and $34.95 here.
Yeah, I'm jumping for joy. Come read about it on my blog.
Sonya from missbossypants
Blackwatch Baby & Delft Darling Dresses
This dress is actually a much darker, richer green, but for some reason it came outalmost like a teal in the photos. It's about an 18/24 month size and made of good old-fashioned velvet. I bought the dress at a thrift store about a year ago. It had a horrible crispy lace ruffle around the bottom and a HUGE ugly, stained white bib around the neck. I first removed both of those and the cut a new hem ruffle and a small stand up neck ruffle out of some plaid taffeta I had that is similar to the Blackwatch plaid. I hand sewed both ruffles onto the dress myself in a hotel room in Pensacola. LOL. I also hand hemmed the bottom ruffle. I had the plaid as a remnant for under $1 and the dress was thrifted for $1. Total cost of the re-do was about $1.30.
I call this dress the Delft Darling because it is white and blue like a piece of Delft pottery I used a 1970's pattern for the basic shape of the dress but made a few changes. Instead of one skirt, I made two skirts; I felt it added to the dutch look of the dress. I also gave it a stand up ruffle collar instead of a bib and I made contrasting cuffs on the sleeves instead of elastic on a single color. The dress is a small toddle dress, I'll have to dig up the pattern to find out exactly what the size is. One sleeve is NOT bigger than the other, it's just the way it looks in the photo because the wind was blowing it around. I hand sewed this entire piece at the hotel in Memphis. It's made from a pillow case (28 cents at a Salvos in NY) and about1/2 a yard of old $1-a-yard fabric I had laying around. The zipper is new and was about $1.30. The approx cost of the whole thing is $2.80. I plan to add an embroidered scene onto the over skirt eventually, either a design that mimics the fabric pattern or a small dutch pottery scene. It depends on how elaborate I want to get with it.
Jenny at Kerrfect!
Spring Fling Pillowcase Dress
Jenny at Kerrfect!
Thursday, June 17, 2010
$4.03 dress
So this dress started out as muslin for fit, but the more I sewed, the more I liked it! I got the fabric for a dollar at a garage sale. Pearl snaps were $2.70, zipper was $0.33, grand total was $4.03. How's that for frugal?
Rather long-winded back story on this dress is on my blog. I love how this dress turned out and can see myself wearing it often.
cheers!
Farah
Rosebud Pillowcase Dress
I made this dress from a pillow case I bought at a thrift store for 50 cents I think. The pillow case had a yellow cuff at one end and the main body was this white muslin with yellow rose buds. I used a vintage 70's patterns for the main dress shape, but I added the front ruffles, sleeve ruffles and other trim on my own. The lace trim was more thrifted vintage lace from a bag of various type that cost me $2, so I used probably 10 cents worth of that. The zipper is new and was $1.30. This makes the total cost of the dress about $1.90. I sort of had a mini-Marie Antoinette vision when I picked up the pillow case and examined it and so that's what I was going for here. I wish I had a little one to put in the dress so you could see it better but I don't It's a size 2 if I remember right. I made the front ruffles by folding strips of yellow over on themselves and sewing them down with a piece of lace over the seam, then while I was making the top half of the dress I just pined them on in a ruffled way and sewed up the seams, then I came back and hand tacked the ruffles down. I added the neck line lace and hem lace after the dress was completed. The arm ruffles were also added after the fact. They are the edge of the yellow pillow edge, folded just as they were on the pillow. I simple cut them larger then the arm holes, sewed up the under arm edge and ruffled as I sewed. The lace trim went on last to give the arm ruffles a more finished look.
Jenny at Kerrfect!
Election Shoulder Bag
This bag took me about an hour and 1/2 to make. I used all but two tiny carrot shaped strips of the state fabric. I bought it at Jo Ann as a remnant for 70 cents I think. It was cut crooked so I had to level it up. It was so bright and interesting I knew I wanted to make a bag out of it but I wasn't sure what to do for the lining. I wanted it to be sort of stiff but not terribly rigid so I used a super thick white glossed canvas drapery sample I bought at Lowe's for $1 about a year ago (still have about 1/3 left). They were cleaning out all of the discontinued stuff. I knew I'd be able to use it for something ONE day. It cost me $1. The top trim and strap are made from vintage woven cotton strips that spell out VOTE. I found a whole roll of it at a thrift store for $3. I used a little less that half the roll so I'll value that at about $1.40. The closure is a BIG red button I already had and a loop made from the scrap left of the state fabric. So the total cost of the bag was approx $3+/-. I started by leveling and determining how big the state fabric piece I had was. Then I cut an equal size piece out of the drape sample making it a little bit taller than the state fabric. The drapes had a very pretty side seam I wanted to use as the top-inside of the bag. I folded each in half and sewed the open sides of each together. I worked with the pieces inside out, the state fabric will later be turned right side out but the drapes will stay inside out. Next I made a small fold in the center of the side that didn't need to be sewn up and I sewed it inward, making a pin tuck of crease. Then I did the same thing 1/2 an inch to either side of both side seams; on the state fabric I made them outward facing. Then I did the same thing to the bottom of the bag pieces, creating sort of a squared off shape. I folded and sewed the corners completing the structure of the bag. I turned the state fabric right-side-out, put the drapes inside it, evened thoe tops up so that the state fabric was just below the hemmed edge of the drapes and tacked it down with the machine. The state fabric was slightly larger (fractions of an inch) so I made a tiny fold in the center of both the front and backs of the bag. I cut my trim, lined it up on the top of the bag so that when I sewed it on I could stay in the white line (so you wouldn't see the stitches) and attached it all the way around. I then went around a second time on the lower white line so the trim wouldn't fold up over time. I took the rest of the trim I had cut folded the ends under and attached it to the sides of the bag by sewing a square over it, then I repeated the same on the other side. I finished it up by attaching a big red button on the top-center inside the bag and a folded and sewn strip of the state fabric made into a loop opposite it to work as a closure. I know it's about in the middle of a term so I'm both too late and too early for elections, but I thought it was cute and I would use it anytime!
I'm sorry to post so much in such quick succession, but I have a lot of things stored up like I said. As I am posting things on my own blog I'm posting them over here. Maybe I can make up for 2 months of not posting anything. lol
Jenny at Kerrfect!
Wednesday, June 16, 2010
Yellow Rose Childs' dress
Jenny at Kerrfect!
Lavender & Roses Dress
I am sorry I haven't been posting very much. I've been neglecting my own blog as well. I am trying to get into the local monthly downtown market as a vendor and I've been trying to build up and put the finishing touches on some of my items so that I can (hopefully) sell some of them and get more people interested in Upcycling items!
Jenny at Kerrfect!
Monday, June 14, 2010
A successful failure?
I found a really super comfy dress at our local thrift store, and I had to have it, since it had these really great blue and green hues. It is so comfy, and fits well, so I thought I'd try to copy it. Here it is:
My local fabric store had this great purple linen blend on sale for $3.50/metre, so I thought, hey, I'm not losing much if it doesn't work out! So, off I went, tracing sections of the dress in my haphazard sort of way. The waist is empire-style, with an elastic waistband. The waistband looked pretty blah, so I thought it needed a nice sash to cover it, and to give the dress a little pop of colour. The front and back, where they meet at the shoulder, didn't really.... meet.all.that.well. So, I wrapped the shoulders in turqouise grosgrain ribbon, and sewed on a turquoise button, just for the fun of it. (I even put the buttons on with my sewing machine! Yay for figuring that out!)
So, here's the failure side of it all: I think it's a bit short, the front gapes in the chest area (good thing I had good coverage with the camisole underneath!), and overall, it makes me look pregnant!!! Whenever I tryo something on in front of a mirror, I tend to stand tall, suck in and smile. Stuff always looks good when you do that! But 10 minutes later, out in public, my gut relaxes and the posture slips, and the empire waisted dress turns into a quasi maternity dress.
.....but it's oh so comfy. What's the verdict, continue wearing it, or file it under "fail"?
Sunday, June 13, 2010
Finished skirt!
The process of making it wasn't without snags. I made the size that corresponded to my measurements, but I ended up having to take it in about 4 inches so it would fit my waist! Unfortunately, that was after the side zipper was in and the yoke was attached - serves me right for not trying it on sooner! It also looks more poofy that in does in the pattern picture, but I think it still works. I don't think the pictures below really do the skirt or the fabric justice, but I hope you get the idea. :-)
Close up of the fabric. There are some really pretty gold flecks throughout that don't show up at all in the picture.
Next up, re-doing another skirt that didn't fit right (I love skirts!) and then I'm going to go crazy making tops. I desperately need more tops!
Saturday, June 12, 2010
Sunhat
It's been some time since my last post and I'm glad to see the list of TTGR contributors growing!
I've been sewing, a lot. But not quite refashioning, though. I have a ton of muslins to put together as refashions. Hopefully they will be wearable.
A little thing to show you would be this summer hat I finished yesterday (started last year, heh..).
I used linen and taffeta scraps to make it. The pattern is from Burda.
Ciao!
Barbara
Friday, June 11, 2010
Wednesday, June 9, 2010
Doona to a dirndl and thrifty red skirt
I'm so glad to meet you all and look forward to this being the 'sew retro' of the refashioning world !
My name is Lore and i blog over at sew red hot. I sew clothes / aprons / quilts / potholders / bags. You name it. I'm obsessed!
I have two things to share today. My refashioning of a doona cover found in a charity shop.
Into a cute summer dirndl:
Total cost $3.75.
Blogged here
I have a whole side of the mauve/lilac fabric from the doona cover left over. If you live in Sydney visit me and it'll be yours. If you live in the United States - hey there's a big drive on to come to Australia for a holiday - pop into Sydney and I'll take you and show you the sights and you can take home half a doona in your luggage! If I get no takers, I suppose it will be good material for a toile/muslin for a tricky pattern.
And my op shop fabric find for $2.50 some great red cotton and lilac lining.
This is blogged here.
So that's my introduction. Again, nice to meet you and hope to be seeing a lot of you and your creations.
And a big thanks and congratulations to Ninjaeema on this Garde Robe baby and also the upcoming baby!
lore
x
anime cosplay costume from the Stash Closet of Doom
Sunday, June 6, 2010
How do sheep protect you from the sun?
The sheep fabric was a gift from the girl I'm making the dress for, the lining and interfacing were from the stash.
Favorite Jeans Reborn
A little refashioning imagination:
New skirt:
The tutorial can be found here on my blog. Come join in the fun; another blogger and I are having a denim skirt challenge - show us your creative side!